
Simply the Best and Easiest Gluten-Free Carrot Cake Recipe Ever!!!
This no hassle recipe results in a light, moist and utterly delicious Carrot Cake.
Ingredients

For the Cake:
- 1 cup white sugar
- ½ cup brown sugar, packed down
- 2 cups gluten-free flour
- 1½ teaspoons baking powder
- 1 teaspoon baking soda
- 1 tablespoon cinnamon
- ½ cup desiccated coconut
- 1 cup vegetable oil
- 3 eggs
- ½ cup natural yogurt
- 1 tsp vanilla extract
- 3 cups of grated carrots
- 1 cup raisins
For the Icing:
- ½ cup cream cheese, room temperature
- ¼ cup butter, room temperature
- 2 cup icing sugar
Method
Pre-heat the oven to 180ᵒc or 170ᵒc fan.
Line two 8inch round tins with baking parchment.
In a large bowl mix together the white and brown sugar, gluten-free flour, baking powder, baking soda, cinnamon and desiccated coconut.
Add the vegetable oil, eggs, yogurt, vanilla, grated carrots and raisins and whisk until all the ingredients are combined.
Pour the cake batter into the prepared tins and bake for 40-45 minutes.
Leave the cakes to cool in the tins for 10 -15 minutes then turn out onto a wire cooling rack to cool completely.
To make the cream cheese icing, simply place the butter and cream cheese in an electric mixer and beat until combined.
Then slowly add icing sugar whilst whisking after every addition
Spread the icing in between and on top of the cooled cakes to assemble the most delicious and stress-free Carrot cake ever.
This cake can be cut into 10 generous slices and will last about 7 days if stored in an air-tight container
Enjoy X
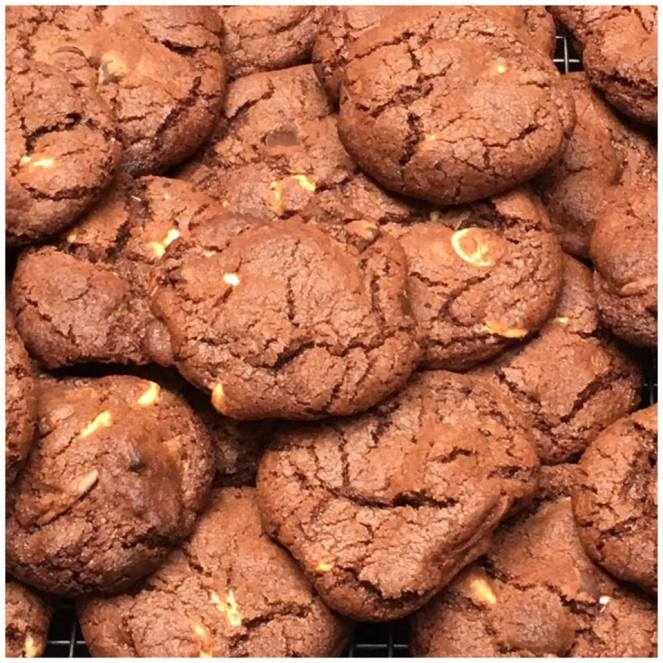
Gluten-Free Triple Chocolate Biscuits
These luxurious Chocolate treats are a hybrid between English biscuits and American cookies. They are simply scrumptious. Gooey on the inside and crispy on the outside, no one would guess that these biscuits are gluten-free. This recipe makes 30 medium sized biscuits or 20 very large ones.
Ingredients
200g butter
300g caster sugar
1 large egg
275g gluten free flour mix
1 ¼ tsp Baking Powder
75g cocoa powder
100g Milk Chocolate Chips
100g White Chocolate Chips
100g Dark Chocolate Chips
Method
Preheat your oven on to 200 degrees Celsius or 190 fan. Line two baking trays with parchment paper.
Simply put all the ingredients except from the Chocolate Chips into a large bowl and mix the ingredients together. I use my stand mixer to do this but an electric hand whisk or a wooden spoon would work just as well.
The resulting mixture takes a while to come together but resist the temptation to add any more liquid. When the mixture does form into a dough it is very stiff.
At this stage add the Chocolate Chips and stir them through the mixture until they are evenly distributed. I sometimes add bits of a broken up caramel chocolate bar into the mixture to make it extra indulgent.
Form the dough into balls and place on your lined baking trays. Be sure not to place your balls of dough to close to each other as they will spread significantly in the oven. I normally place six balls of dough on each tray.
If you are making medium sized biscuits they will cook for 10 minutes if you are baking larger ones they will require one additional minute in the oven.
When your biscuits have had their time in the oven, it is vital that you leave them on their hot baking tray for 2 to 5 minutes before attempting to move them onto cooling rack or into your mouth.
These Biscuits should last for a good week in an air tight container and are always a crowd pleaser with family and friends.
Note that some chocolate does contain traces of gluten so be careful to ensure that the dark chocolate you use is safe if you are catering for those with allergies
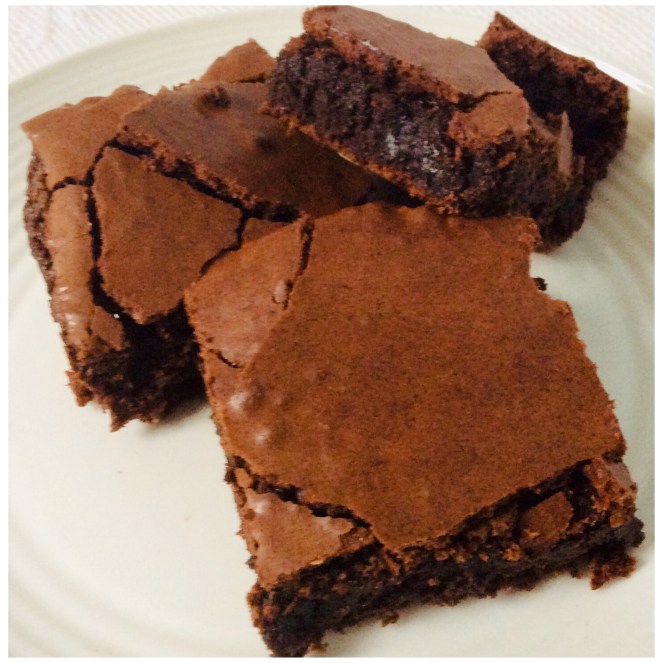
Gluten and dairy free brownies
These devilishly dark brownies are simply perfect when catering for those with allergies or intolerances. Indulgent and gooey, these brownies are entirely scrumptious and moreish. Requiring only the smallest amount of gluten free-flour, these treats are fudgy and moist in texture with the thinnest layer of crunchy chocolate on top.
Ingredients
185g dairy free spread (I use Vitalite Dairy Free Spread)
185g 70% dark chocolate
80g of a gluten free flour mix (I use Juvela white mix)
45g cocoa powder
100g dark chocolate chips
3 large eggs
275g caster sugar
Method
- Break the dark chocolate into small pieces placing it into a medium microwave safe bowl with the dairy free spread. Put this blow into the microwave for 30 second intervals. Make sure to stir the ingredients between each interval to prevent the mixture from burning as it melts together. Once the chocolate and spread have melted place to one side to cool.
- While you wait for the chocolate to cool, preheat your oven to 180C/ 160C fan/ gas 4 and prepare a 20cm square tin by lining it with non-stick baking parchment.
- Crack three large eggs into a large bowl. Then add the caster sugar. With an electric mixer on maximum speed, whisk the eggs and sugar. Mix until the mixture becomes thick and creamy. This process can take up to 8 minutes, depending on how powerful your mixer is. You will know the egg and sugar mixture is ready when the mixture becomes pale and doubles in size.
- Pour the cooled chocolate mixture into the whipped eggs and sugar. Next gently fold the two mixtures together with a metal spoon. Cut into the mixture with your spoon, bringing the mixture that is underneath to the surface. Fold using a figure of eight movement. Be careful to move the bowl round each time you fold and do so until the two mixtures are one in colour.
- Sieve your gluten-free flour and coco powder over the bowl of eggy chocolate mixture and fold until the mixture is uniform in colour and no flour is left unincorporated.
- Fold the dark chocolate chips into the mixture.
- Pour the brownie mixture in to your prepared tin and place in the oven for 40 minutes.
- Once your brownies are out of the oven leave to cool completely before cutting.
Note that some chocolate does contain traces of gluten so be careful to ensure that the dark chocolate you use is safe if you are catering for those with allergies
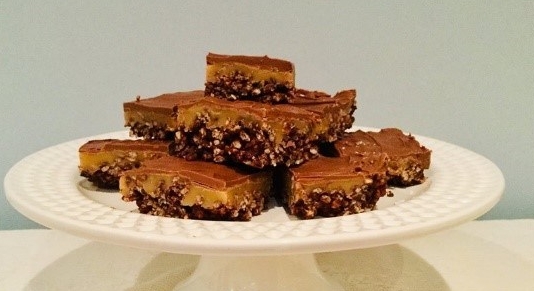
Millionaire Toffee Crisp Treats
This rich and gooey traybake requires no oven time and is extremely delicious. Consisting of a puffed chocolate rice base, devilishly stringy toffee and a thick layer of milk chocolate, the recipe which follows contains no trace of gluten. While the method is straightforward, these treats do require time to set. In order to ensure that these delectable treats are safe for those following a gluten-free diet please note that some puffed rice contains barley malt so it is necessary to source a gluten free puffed rice cereal.
Ingredients:
Base:
135g gluten-free rice puffs
150g dark chocolate (70% coco)
50g salted butter
60g Golden syrup
Caramel:
100g butter
100g caster sugar
30g golden syrup
1 large can of condensed milk
Topping:
300g milk chocolate 00000
Method:
Line your tray (I use a 30 x 20 x 5cm tray) with parchment paper.
Break the dark chocolate into little pieces and melt with the salted butter and the golden syrup in a large saucepan. Over low heat, stir the mixture occasionally until it has all melted and there are no lumps remaining, this will take about 4 minutes.
Remove the pan form the heat, being careful to ensure that it is paced on a heatproof surface. Pour in the rice puffs and then fold briskly until they are evenly coated in the chocolate mixture, then turn into your lined tray. Evenly spread the mixture in the tray. Using the back of a metal spoon press down on the mixture to ensure that there are no pockets of air in your chocolate base. Put in the fridge to set for 1 hour.
To make the caramel, add the butter, caster sugar, golden syrup and condensed milk to a saucepan and heat gently until the sugar has dissolved, stirring occasionally throughout this process. Once dissolved, increase the heat and boil the mixture for 5 minutes, stirring continuously. Remove from the heat and leave to stand for 1 minute before pouring onto the rice crispy base. Leave to set in the fridge for approximately an hour.
To finish the traybake, break up and melt the milk chocolate in a microwavable dish for 2 minutes ensuring you stir it half way through. Once the caramel has set, spoon the chocolate on top ensuring it is spread evenly and then leave it to set at room temperature.
